
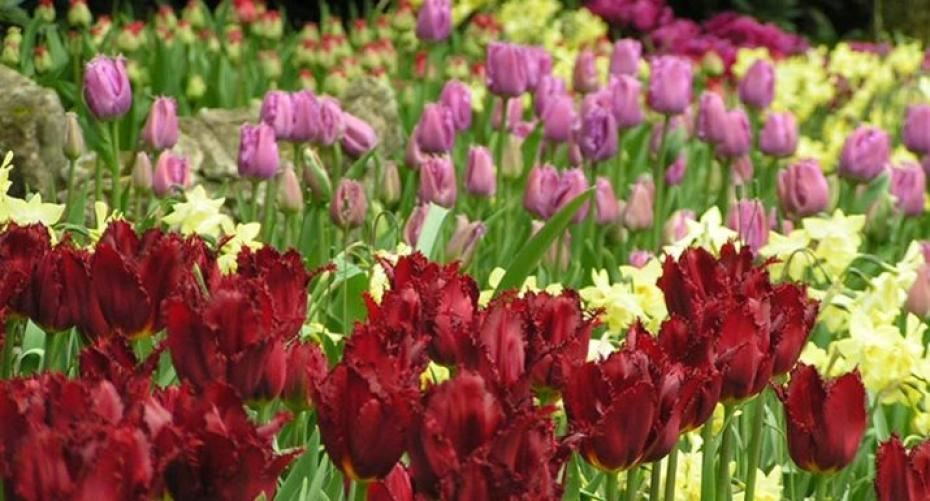
Tulips are the essential flower for a shot of brilliant spring colour
Who doesn’t have room for a splash of spring colour from even a tiny pot of tulips? Plant a river of colour or pop a pot onto the windowsill, these dashes of colour are a sign that summer is just around the corner. They have been a garden favourite since being introduced into Europe from Turkey in the mid-16th Century. A 100 years later tulip mania hit Holland, which resulted in many speculators losing everything. They are a spring flowering bulb ranging in height from 10cm (4”) to 71cm (28”). There are about 75 species in the wild, but hundreds of man-made varieties in almost every colour, except the elusive black. They originate in mountain areas with a temperate climate; the Himalayas, Europe and the Middle East. They are round bulbs with a thin skin and a pointed tip and goblet shaped flowers. Most of the large modern hybrids are replaced every year, as the flowers become smaller and smaller in subsequent years.
They look fantastic inter-planted with Forget-me-nots and Wallflowers. Block planting one colour in a Buxus (Box) edged parterre also looks stunning. For a less formal look just plant a river of colour through the border or inter-plant with other bulbs, such as Narcissi or Muscari; just make sure they are all flowering at the same time.

Tulips, Forget-me-nots and Hyacinth at Keukenhof Gardens
Planting
They are available in garden centres from late summer, when you will have the pick of the best quality bulbs and the greatest choice of variety. Later on in the season the bulbs start to deteriorate. Reject any that are soft, showing signs of mould or which have started sprouting. They need a well-drained, sunny site sheltered from strong winds. They should be planted in November, planting sooner can expose any new growth to frost. They prefer an alkaline soil so if you have an acid soil just add 85 – 115g (3 – 4oz) of lime per square metre (3’4” x 3’4”). Dig in some blood, fish and bone or seaweed meal before planting. Plant the bulbs according to their species and size, most are planted about 15cm (6”) deep. Space them about 10cm (4”) apart. Blindness, not producing a flower, can be caused by allowing them to dry out, so make sure they are always well watered.
Growing in containers
Any sort of container can be used, just use a good quality compost, such as John Innes No 3, which has food added. Plastic or aquatic pots can be used and sunk into the border to add a shot of colour if you have any gaps; and are easily removed to die down out of sight. Large decorative pots can be half filled with polystyrene to make them easier to move, or bricks if theft is a problem. Filling the bottom of the pot with other material also cuts down on the amount of compost needed. A plastic pot can be inserted inside a decorative one, which can then be easily removed as soon as they go over.

Storing
Deadhead as soon as the flowers have finished and feed weekly with a high potash feed, such as Tomorite, until the foliage starts to turn yellow and die back. Lift the bulbs as soon as the foliage has died back, spread out on newspaper until they have dried. Once dry clean off all the foliage, roots and any loose scales from the bulb. Separate the small bulbs from the parent bulb. Unless you want to grow on the smallest bulbs, discard the small ones. Store in paper bags or a cardboard box somewhere cool (16 - 18C, 61 - 64 F), dark and well ventilated, and out of the reach of mice. In November plant the bulbs in batches according to their size, only letting the largest ones flower. The smallest bulbs can take 4 – 5 years to reach flowering size, so nip out any flowers to allow all the energy to be concentrated on growing the bulb.
If you need the space the tulips occupy then lift them and plant in pots or somewhere out of the way until they have naturally died down. Small species tulips, such as: Tulipa kaufmanniane, T. tarda, T. turkestanica, can be left in the ground to naturalise.

Pests and diseases
Mice are problem, as they dig up the bulbs soon after they are planted so make sure you plant them deep enough.
Slugs are a problem when they are just showing through the soil, they can eat down into the bulb, so take preventative measures before they start to show any growth.
Stem and bulb eelworm results in malformed stems and leaves, eventually rotting the bulb. Dig up the infected bulbs and any within a metre radius, dispose of in the grey bin, don’t put into compost or the green recycling bin. There is no chemical treatment available.
Virus’ result in white streaks on the leaves and different coloured streaks on the petals. The splashed petals of some varieties are produced by a virus and deliberately bred into the bulb. Lift and destroy infected bulbs.
Moulds affect the flowering of the bulb, often rotting the tip and preventing the new shoot from emerging. Destroy the bulb and don’t plant them in the same place next year as the mould can lie dormant in the soil.
Tulip fire is caused by a fungus and results in withered growth and brown patches on the leaves. There is no control so destroy bulbs and don’t grow in the same place next year.
Blindness or withered flowers is caused by a lack of water, so make sure they are always well watered. Blindness can also be caused by lack of nutrients or the bulbs becoming overcrowded.

![Kingsbury-bench-05[1].jpg](http://www.hayesgardenworld.co.uk/cdn/shop/files/Kingsbury-bench-05_5B1_5D.jpg?v=1712162737&width=1500)
![Kingsbury-bench-01[1].jpg](http://www.hayesgardenworld.co.uk/cdn/shop/files/Kingsbury-bench-01_5B1_5D.jpg?v=1712161065&width=1500)
![tw17a-4947_0[1].jpg](http://www.hayesgardenworld.co.uk/cdn/shop/files/tw17a-4947_0_5B1_5D.jpg?v=1712161495&width=1500)
![tw17a-4947_tenbury_5ft[1].jpg](http://www.hayesgardenworld.co.uk/cdn/shop/files/tw17a-4947_tenbury_5ft_5B1_5D.jpg?v=1712161172&width=1500)
![tw17a-4952_tenbury_4ft[1].jpg](http://www.hayesgardenworld.co.uk/cdn/shop/files/tw17a-4952_tenbury_4ft_5B1_5D.jpg?v=1712161034&width=1500)
![thumbnail_IMG_1565-kik_2[1].jpg](http://www.hayesgardenworld.co.uk/cdn/shop/files/thumbnail_IMG_1565-kik_2_5B1_5D.jpg?v=1712226536&width=1500)
![thumbnail_IMG_1565-kik_1[3].jpg](http://www.hayesgardenworld.co.uk/cdn/shop/files/thumbnail_IMG_1565-kik_1_5B3_5D.jpg?v=1712159637&width=1500)


![WD-XgESA[1].jpeg](http://www.hayesgardenworld.co.uk/cdn/shop/files/WD-XgESA_5B1_5D.jpg?v=1712159609&width=1500)